Extracting Super Mario Bros levels with Python

Introduction
For an upcoming project, I need to extract level data from the classic 1985 video game Super Mario Bros (SMB). More precisely, I want to extract the background imagery for each stage of the game, excluding HUD elements and moving sprites, etc.
Of course, I could just stitch together images from the game, and perhaps automate this process with computer vision techniques. But I think the method described below is more interesting, and allows for inspection of elements of the level perhaps not exposed through screenshots.
In this first stage of the project, we will explore 6502 assembly and an emulator written in Python. Full source code is available here.
Source code analysis
Reverse engineering any program is a lot easier if you have the source code available, as we have here in the form of 17,000 lines of 6502 (the NES CPU) assembly code, posted by doppelganger. Because Nintendo has never made an official source release, it was created by disassembling the SMB machine code, painstakingly deciphering what each part means, and inserting comments and meaningful symbol names along the way.
A quick search through the file and we find something that looks like it might be the level data we seek:
;level 1-1
L_GroundArea6:
      .db $50, $21
      .db $07, $81, $47, $24, $57, $00, $63, $01, $77, $01
      .db $c9, $71, $68, $f2, $e7, $73, $97, $fb, $06, $83
      .db $5c, $01, $d7, $22, $e7, $00, $03, $a7, $6c, $02
      .db $b3, $22, $e3, $01, $e7, $07, $47, $a0, $57, $06
      .db $a7, $01, $d3, $00, $d7, $01, $07, $81, $67, $20
      .db $93, $22, $03, $a3, $1c, $61, $17, $21, $6f, $33
      .db $c7, $63, $d8, $62, $e9, $61, $fa, $60, $4f, $b3
      .db $87, $63, $9c, $01, $b7, $63, $c8, $62, $d9, $61
      .db $ea, $60, $39, $f1, $87, $21, $a7, $01, $b7, $20
      .db $39, $f1, $5f, $38, $6d, $c1, $af, $26
      .db $fd
If you are not familiar with assembly, this is just saying “insert these bytes
verbatim into the compiled program, and then allow other parts of the program to
refer to it via the symbol L_GroundArea6”. You can think of it as an array
where each element is a single byte.
The first thing to note is that this is a very small amount of data (about 100
bytes). This rules out any sort of encoding which allows arbitrary placement of
blocks in the level. After a bit of searching, I found
that this data is actually read (after some indirection) in
AreaParserCore.
This subroutine in turn calls lots of other subroutines, eventually calling a
specific subroutine for each type of object allowed in a scene (eg.
StaircaseObject, VerticalPipe, RowOfBricks) for over 40 different objects:
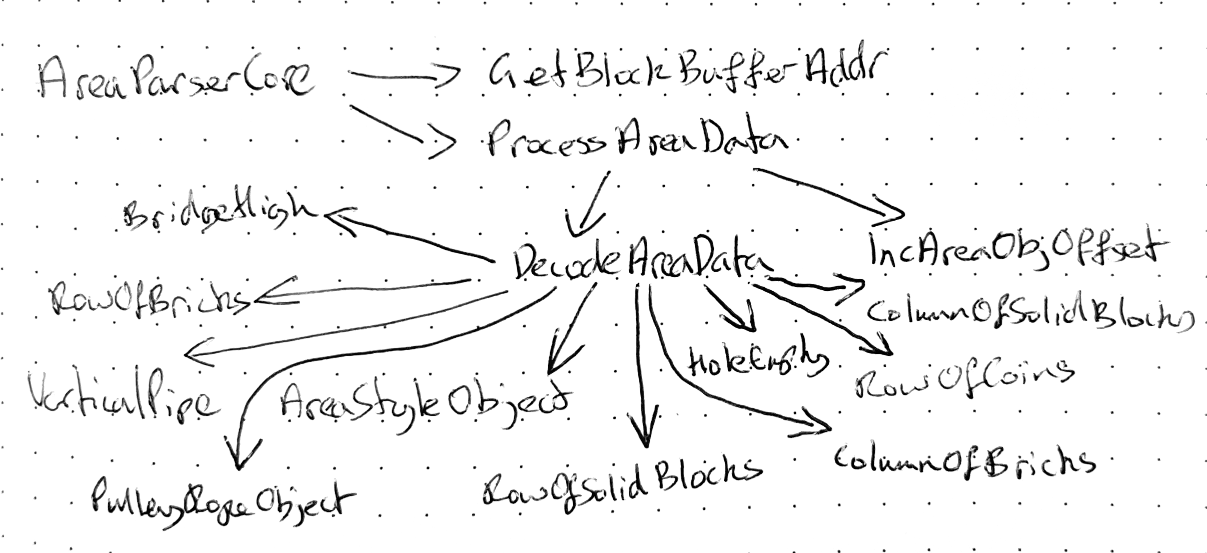
Abbreviated call graph for AreaParserCore
The routine writes into a MetatileBuffer: a 13-byte-long section of memory,
which respresents a single column of blocks in a level, each byte representing a
single block. A metatile is a 16x16 block that makes up the backgrounds in SMB:
Level with boxes drawn around the metatiles
They are called metatiles because each one consists of four 8x8 pixel tiles — but more on this later.
The fact that the decoder works in terms of predefined objects explains the small level size: the level data needs to refer just to object types and locations, for example, “place a pipe at location (20, 16), a row of blocks at location (10, 5), …”, however, it does mean that there is a lot of code required to turn the raw level data into metatiles.
Porting this amount of code in order to write my level extractor would take far too long, so let’s try a different approach.
py65emu
If we had an interface between Python and 6502 assembly we could call the
AreaParserCore subroutine for each column of the level, and then use the the
more concise Python to convert the block information into the desired image.
Enter py65emu, a succinct 6502 emulator with a Python interface. Here is how to set up py65emu with the same memory map configuration as the NES:
    from py65emu.cpu import CPU
    from py65emu.mmu import MMU

    # Load in the program ROM (ie. the compiled assembly)
    with open("program.bin", "rb") as f:
        prg_rom = f.read()

    # Define the memory mapping.
    mmu = MMU([
        # Create 2K RAM, mapped to address 0x0.
        (0x0, 2048, False, []),

        # Map the program ROM to 0x8000.
        (0x8000, len(prg_rom), True, list(prg_rom))
    ])

    # Create the CPU, telling it to start executing at location 0x8000
    cpu = CPU(mmu, 0x8000)
After this we can execute a single instruction with the cpu.step() method, and
we can inspect the memory mmu.read(), and check the machine’s registers with
cpu.r.a, cpu.r.pc, etc. In addition we can write to the memory with
mmu.write().
It should be noted that this is only an emulator for the CPU of the NES: it does not emulate other parts of the hardware such as the PPU, so it cannot be used to emulate the entire game. It should, however, be sufficient for calling the parsing subroutine, as this does not rely on any hardware beyond the CPU and memory.
The plan is to set up the CPU as above, and then for each column of the level,
initialize sections of the memory with the inputs required by AreaParserCore,
call AreaParserCore, and then read back the column data. Once this is done
we will use Python to compose the result into an image.
But before we do this we will need to compile the assembly listing into machine code.
x816
As noted in the source, the assembly compiles with x816. x816 is an MS-DOS based 6502 assembler used by the NES homebrew and ROM hacking community, and it works great in DOSBox.
Along with the program ROM required by py65emu, x816 produces a symbol file which maps symbols to their memory locations in the CPU’s address space. Here is an excerpt:
AREAPARSERCORE                   = $0093FC   ; <> 37884, statement #3154
AREAPARSERTASKCONTROL            = $0086E6   ; <> 34534, statement #1570
AREAPARSERTASKHANDLER            = $0092B0   ; <> 37552, statement #3035
AREAPARSERTASKNUM                = $00071F   ; <> 1823, statement #141
AREAPARSERTASKS                  = $0092C8   ; <> 37576, statement #3048
Here we can see the AreaParserCore function will be accessible at address
0x93fc in the source.
For convenience, I put together a parser for the symbol file, which maps between symbol names and addresses:
sym_file = SymbolFile('SMBDIS.SYM')
print("0x{:x}".format(sym_file['AREAPARSERCORE'])) # prints 0x93fc
print(sym_file.lookup_address(0x93fc)) # prints "AREAPARSERCORE"
Subroutines
As mentioned in the plan above, we want to be able to call the AreaParserCore
subroutine from Python.
To understand the mechanics of a subroutine let us look at a short subroutine and its corresponding call:
WritePPUReg1:
               sta PPU_CTRL_REG1         ;write contents of A to PPU register 1
               sta Mirror_PPU_CTRL_REG1  ;and its mirror
               rts

...

jsr WritePPUReg1
The jsr (jump to subroutine) instruction pushes the PC register onto the
stack, and sets the PC register to the address referred to by WritePPUReg1.
The PC register tells the CPU the address of the next instruction to load, so
that the next instruction executed after the jsr instruction will be the first
line of WritePPUReg1.
At the end of the subroutine an rts (return from subroutine) instruction is
executed. This command pops the saved value from the stack and stores it in the
PC register, which makes the CPU execute the instruction following the jsr
call.
The great thing about subroutines is that you can have nested calls, ie. calls to subroutines within subroutines. Return addresses will be pushed onto the stack and then popped off in the correct order, in the way you would expect of function calls in a high level language.
Here then is the code for executing a subroutine from Python:
def execute_subroutine(cpu, addr):
    s_before = cpu.r.s
    cpu.JSR(addr)
    while cpu.r.s != s_before:
        cpu.step()

execute_subroutine(cpu, sym_file['AREAPARSERCORE'])
This works by saving the current value of the stack pointer register (s),
emulating a jsr call, and then executing instructions until the stack has
returned to its initial height, which will only happen when the first subroutine
has returned. This is useful, as we now have a way of directly calling 6502
subroutines from within Python.
However, we are forgetting something: how to provide inputs to this subroutine. We need of telling the routine what level we are trying to render, or which particular column we want to parse.
Unlike a high-level language such as C or Python, subroutines in 6502 assembly
do not take explicit inputs. Rather, inputs are passed by setting memory
locations at some point prior to the call, which are then read anywhere within
the subroutine call. Given the size of AreaParserCore, reverse engineering
the required inputs purely by looking at the source would be difficult and open
to human error.
Valgrind for NES?
To work out what the inputs to AreaParserCore were, I drew inspiration from
the memcheck tool for
Valgrind. Memcheck detects accesses to uninitialized memory by storing “shadow”
memory alongside every piece of actual memory allocated. The shadow memory
records whether the corresponding real memory has ever been written to. If
the program reads from an address that has never been written to, an
uninitialized memory error is printed. If we could run AreaParserCore with
such a tool it would tell us the inputs to the subroutine that should be set
before being called.
It is actually very easy to write a simple version of memcheck for py65emu:
def format_addr(addr):
    try:
        symbol_name = sym_file.lookup_address(addr)
        s = "0x{:04x} ({}):".format(addr, symbol_name)
    except KeyError:
        s = "0x{:04x}:".format(addr)
    return s

class MemCheckMMU(MMU):
    def __init__(self, *args, **kwargs):
        super().__init__(*args, **kwargs)
        self._uninitialized = array.array('B', [1] * 2048)

    def read(self, addr):
        val = super().read(addr)
        if addr < 2048:
            if self._uninitialized[addr]:
                print("Uninitialized read! {}".format(format_addr(addr)))
        return val

    def write(self, addr, val):
        super().write(addr, val)
        if addr < 2048:
            self._uninitialized[addr] = 0
Here we have wrapped py65emu’s memory management unit. This class maintains an
array, _uninitialized, whose entries tell us whether the corresponding byte of
the emulated RAM has ever been written to. When an uninitialized read occurs,
the address of the invalid read and the corresponding symbol name are printed.
Here is what the wrapped MMU produces when
execute_subroutine(
    sym_file['AREAPARSERCORE']
)
is called:
Uninitialized read! 0x0728 (BACKLOADINGFLAG):
Uninitialized read! 0x0742 (BACKGROUNDSCENERY):
Uninitialized read! 0x0741 (FOREGROUNDSCENERY):
Uninitialized read! 0x074e (AREATYPE):
Uninitialized read! 0x075f (WORLDNUMBER):
Uninitialized read! 0x0743 (CLOUDTYPEOVERRIDE):
Uninitialized read! 0x0727 (TERRAINCONTROL):
Uninitialized read! 0x0743 (CLOUDTYPEOVERRIDE):
Uninitialized read! 0x074e (AREATYPE):
...
Searching around the code, we see that many of these values are set by the
subroutine InitializeArea, so let’s re-run the script with a call to this
function first. Repeating this process, we end up with the following
arrangement of calls, which needs just the world number and area number to be
set:
mmu.write(sym_file['WORLDNUMBER'], 0)    # World number, minus 1
mmu.write(sym_file['AREANUMBER'], 0)     # Level number, minus 1
execute_subroutine(sym_file['LOADAREAPOINTER'])
execute_subroutine(sym_file['INITIALIZEAREA'])

metatile_data = []
for column_pos in range(48):
    execute_subroutine(sym_file['AREAPARSERCORE'])
    metatile_data.append([mmu.read_no_debug(sym_file['METATILEBUFFER'] + i)
                          for i in range(13)])
    execute_subroutine(sym_file['INCREMENTCOLUMNPOS'])
This writes the first 48 columns of World 1-1 into metatile_data, using the
subroutine IncrementColumnPos to increment the internal variables used to
track the current column.
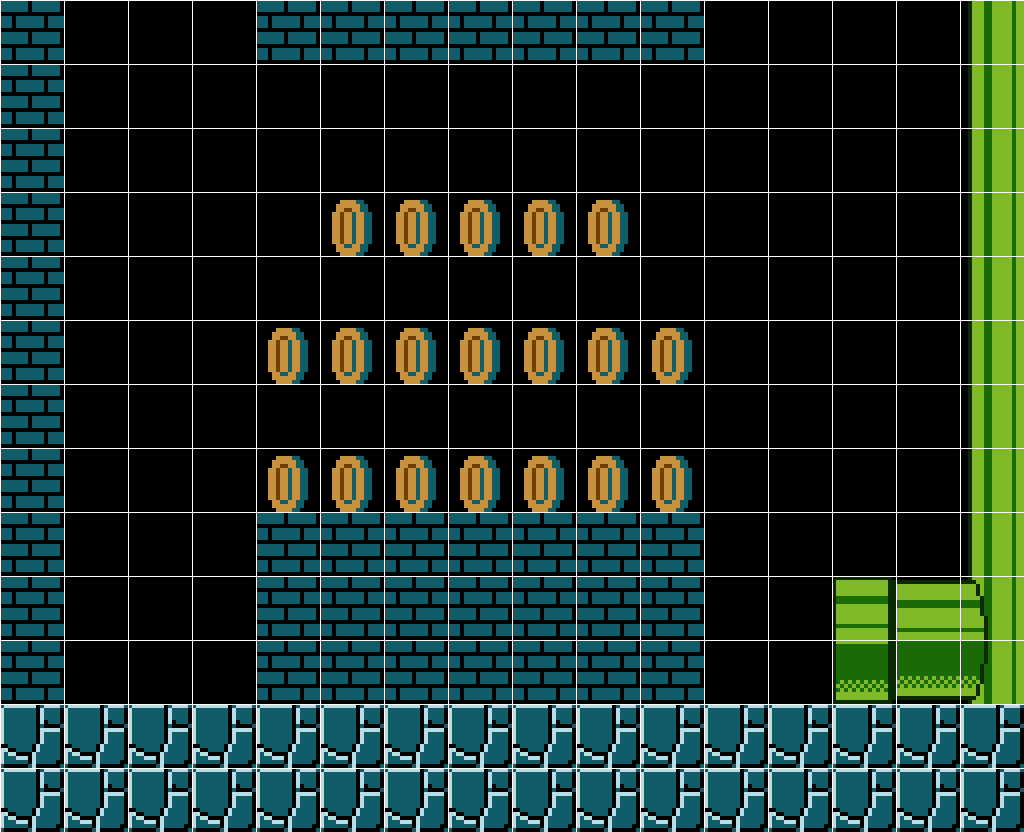
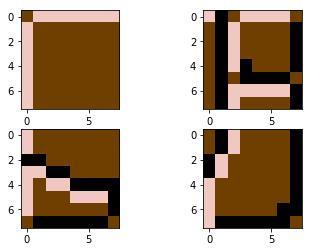
And here are the contents of metatile_data, overlaid onto some screenshots
from the game (bytes with the value 0 are not shown):
metatile_data clearly corresponds with the background information.
Metatile imagery
(Alternatively skip to see the end result here.)
Now let’s look at how we turn the metatile numbers we fetched above into actual images. The following steps were found by analysing the source and studying the documentation on the excellent Nesdev Wiki.
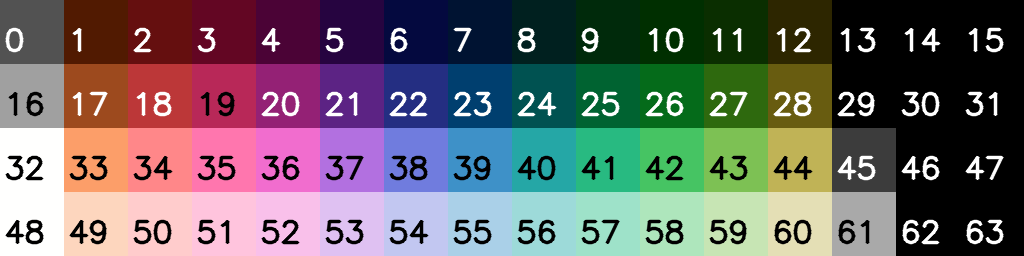
To understand how to render each metatile, we first need to talk about colour palettes on the NES. The NES PPU has the ability to render 64 different colours in total, although black is duplicated a few times (see Nesdev for details):
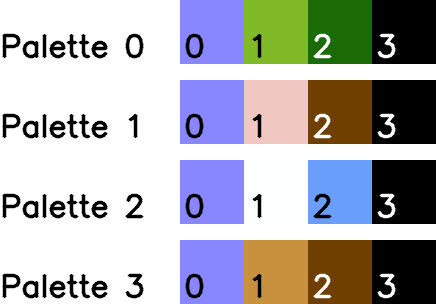
Each Mario level is limited to using only 10 of these 64 colours for its background, divided into 4 four colour palettes; the first colour is always the same. Here are the 4 palettes for World 1-1:
Now let’s take a look at an example metatile number which has been expressed in binary. Here is the metatile number for the cracked rock tile that runs along the ground of World 1-1:
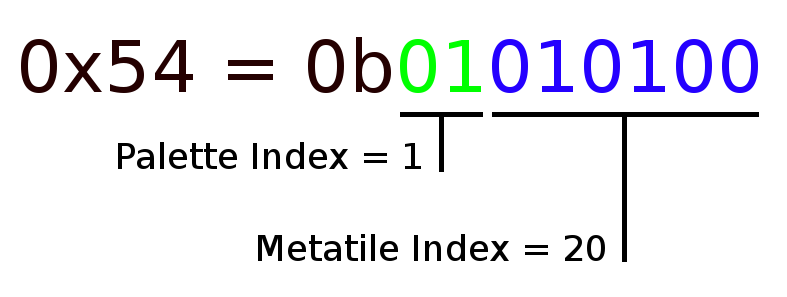
The palette index tells us which palette to use when rendering the metatile, in this case palette 1. The palette index also an index into these two arrays:
MetatileGraphics_Low:
  .db <Palette0_MTiles, <Palette1_MTiles, <Palette2_MTiles, <Palette3_MTiles

MetatileGraphics_High:
  .db >Palette0_MTiles, >Palette1_MTiles, >Palette2_MTiles, >Palette3_MTiles
These arrays combined give a 16-bit address, which for our example points to
Palette1_Mtiles:
Palette1_MTiles:
  .db $a2, $a2, $a3, $a3 ;vertical rope
  .db $99, $24, $99, $24 ;horizontal rope
  .db $24, $a2, $3e, $3f ;left pulley
  .db $5b, $5c, $24, $a3 ;right pulley
  .db $24, $24, $24, $24 ;blank used for balance rope
  .db $9d, $47, $9e, $47 ;castle top
  .db $47, $47, $27, $27 ;castle window left
  .db $47, $47, $47, $47 ;castle brick wall
  .db $27, $27, $47, $47 ;castle window right
  .db $a9, $47, $aa, $47 ;castle top w/ brick
  .db $9b, $27, $9c, $27 ;entrance top
  .db $27, $27, $27, $27 ;entrance bottom
  .db $52, $52, $52, $52 ;green ledge stump
  .db $80, $a0, $81, $a1 ;fence
  .db $be, $be, $bf, $bf ;tree trunk
  .db $75, $ba, $76, $bb ;mushroom stump top
  .db $ba, $ba, $bb, $bb ;mushroom stump bottom
  .db $45, $47, $45, $47 ;breakable brick w/ line
  .db $47, $47, $47, $47 ;breakable brick
  .db $45, $47, $45, $47 ;breakable brick (not used)
  .db $b4, $b6, $b5, $b7 ;cracked rock terrain <--- This is the 20th line
  .db $45, $47, $45, $47 ;brick with line (power-up)
  .db $45, $47, $45, $47 ;brick with line (vine)
  .db $45, $47, $45, $47 ;brick with line (star)
  .db $45, $47, $45, $47 ;brick with line (coins)
  ...
The metatile index when multipled by 4 is an index into this array. The data is
formatted with 4 entries per line, so our example metatile refers to the 20th
line, reassuringly commented with cracked rock terrain.
The four entries on this line are in fact tile IDs: Each metatile consists of
four 8x8 pixel tiles, in the order top-left, bottom-left, top-right, and
bottom-right. These IDs are sent directly to the NES’s PPU and the ID refers to
16 bytes of data in the NES’s CHR-ROM, with each entry starting at address
0x1000 + 16 * <tile id>:
0x1000 + 16 * 0xb4:  0b01111111    0x1000 + 16 * 0xb5:  0b11011110
0x1001 + 16 * 0xb4:  0b10000000    0x1001 + 16 * 0xb5:  0b01100001
0x1002 + 16 * 0xb4:  0b10000000    0x1002 + 16 * 0xb5:  0b01100001
0x1003 + 16 * 0xb4:  0b10000000    0x1003 + 16 * 0xb5:  0b01100001
0x1004 + 16 * 0xb4:  0b10000000    0x1004 + 16 * 0xb5:  0b01110001
0x1005 + 16 * 0xb4:  0b10000000    0x1005 + 16 * 0xb5:  0b01011110
0x1006 + 16 * 0xb4:  0b10000000    0x1006 + 16 * 0xb5:  0b01111111
0x1007 + 16 * 0xb4:  0b10000000    0x1007 + 16 * 0xb5:  0b01100001
0x1008 + 16 * 0xb4:  0b10000000    0x1008 + 16 * 0xb5:  0b01100001
0x1009 + 16 * 0xb4:  0b01111111    0x1009 + 16 * 0xb5:  0b11011111
0x100a + 16 * 0xb4:  0b01111111    0x100a + 16 * 0xb5:  0b11011111
0x100b + 16 * 0xb4:  0b01111111    0x100b + 16 * 0xb5:  0b11011111
0x100c + 16 * 0xb4:  0b01111111    0x100c + 16 * 0xb5:  0b11011111
0x100d + 16 * 0xb4:  0b01111111    0x100d + 16 * 0xb5:  0b11111111
0x100e + 16 * 0xb4:  0b01111111    0x100e + 16 * 0xb5:  0b11000001
0x100f + 16 * 0xb4:  0b01111111    0x100f + 16 * 0xb5:  0b11011111

0x1000 + 16 * 0xb6:  0b10000000    0x1000 + 16 * 0xb7:  0b01100001
0x1001 + 16 * 0xb6:  0b10000000    0x1001 + 16 * 0xb7:  0b01100001
0x1002 + 16 * 0xb6:  0b11000000    0x1002 + 16 * 0xb7:  0b11000001
0x1003 + 16 * 0xb6:  0b11110000    0x1003 + 16 * 0xb7:  0b11000001
0x1004 + 16 * 0xb6:  0b10111111    0x1004 + 16 * 0xb7:  0b10000001
0x1005 + 16 * 0xb6:  0b10001111    0x1005 + 16 * 0xb7:  0b10000001
0x1006 + 16 * 0xb6:  0b10000001    0x1006 + 16 * 0xb7:  0b10000011
0x1007 + 16 * 0xb6:  0b01111110    0x1007 + 16 * 0xb7:  0b11111110
0x1008 + 16 * 0xb6:  0b01111111    0x1008 + 16 * 0xb7:  0b11011111
0x1009 + 16 * 0xb6:  0b01111111    0x1009 + 16 * 0xb7:  0b11011111
0x100a + 16 * 0xb6:  0b11111111    0x100a + 16 * 0xb7:  0b10111111
0x100b + 16 * 0xb6:  0b00111111    0x100b + 16 * 0xb7:  0b10111111
0x100c + 16 * 0xb6:  0b01001111    0x100c + 16 * 0xb7:  0b01111111
0x100d + 16 * 0xb6:  0b01110001    0x100d + 16 * 0xb7:  0b01111111
0x100e + 16 * 0xb6:  0b01111111    0x100e + 16 * 0xb7:  0b01111111
0x100f + 16 * 0xb6:  0b11111111    0x100f + 16 * 0xb7:  0b01111111
The CHR-ROM is a piece of read-only memory that can be accessed only by the PPU, and is separate to the PRG-ROM where the program code is stored. As such, the above data is not available in the source code, and needs to be retrieved from a ROM dump of SMB.
The 16 bytes for each tile make up a 2-bit 8x8 tile: the first bit is the first 8 bytes, and the second bit is the second 8 bytes:
21111111  13211112
12222222  23122223
12222222  23122223
12222222  23122223
12222222  23132223
12222222  23233332
12222222  23111113
12222222  23122223

12222222  23122223
12222222  23122223
33222222  31222223
11332222  31222223
12113333  12222223
12221113  12222223
12222223  12222233
23333332  13333332
Map this through palette 1:
…and join together:
Finally we have our rendered tile.
Putting it all together
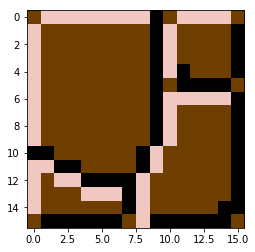
Repeat this routine for each metatile and we get the fully rendered level.

And with that, we have managed to extract level imagery from SMB, purely in Python!
If you enjoyed this post, please consider supporting my efforts: